Category Archives for "Teaching tip"


It was a real joy this summer to participate in Team English National Conference Online. My recorded session is available for you to watch for free here – on YouTube. Below you can download my slides – if that would be useful.
My session covered:
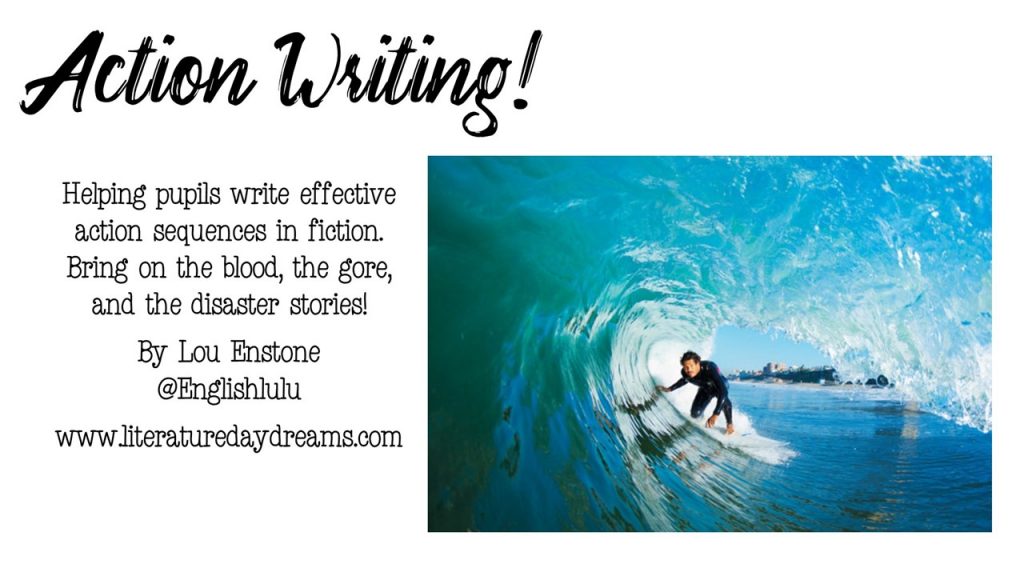
Action? Drama? Blood? Violence? Do your students want to write these stories? Do you never want to mark another mediocre action story?
If your answer is yes, then this free CPD training is for you! If you know students who want to write action sequences, fight scenes, and even gruesome murders, then now is the time to teach them to do it well.
This session will help you with some clear and practical strategies to use in your classroom.
This free creative writing CPD includes:
– my favourite Creative Writing CPD books
– exploring short story writing at school!
– examples of student writing
– Activity 1 – nouns for writing action
– Activity 2 – creating a shot by shot scene
– Activity 3 – adding urgency and interruptions
– Mentor texts
– Recommendations for further reading

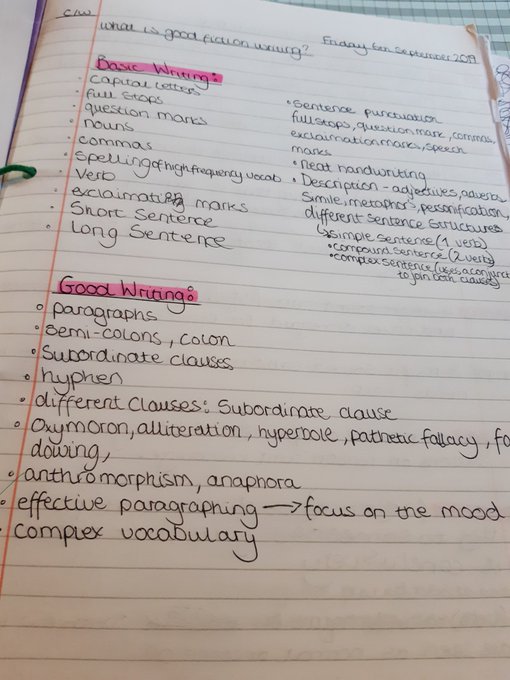
A while ago on Twitter, I shared some photos from my Year 10’s books showing how I introduce Creative Writing at the beginning of the academic year.
Lesson 1: an exploration of what makes sophisticated writing. Followed by sensory description, which is self-assessed, and vocab hwk. pic.twitter.com/yn02s8kSvd
— Lou Enstone (@englishlulu) November 17, 2019
This blog post gives a quick overview of how I introduce Creative Writing to my new GCSE students. Before I start a little bit of context (mostly for my friends in the US). I use these lessons at the very beginning of Year 10 (students will be turning 15 during this academic year), it is a brief introduction to narrative writing. My students sit national standardised exams at the end of a compulsory 2-year English Language course. This examination includes creative writing. In fact, writing makes up 50% of the examination grade and of this, creative writing is 50% again. The next vital fact is that students must achieve a certain pass grade in their English Language GCSE – otherwise they must retake!
For my UK based teacher-friends, my school sits the Edexcel exam board. For the creative writing section, they are given a choice of 2 narrative prompts. No pure description. So these are working towards narrative.
Phewee, ok, now that’s over. Let’s get into the writing!

I am sharing two versions of this lesson. One with an extract from The Handmaid’s Tale (I tend to use this with my older students) and then one with an extract from Harry Potter (hey, don’t judge it). Just click to download the files.
Once my pupils have mastered writing accurate description, we move onto looking at how we add atmosphere to settings. It could be just one sentence, just one phrase to take description from simple to layered with sub-text. This is where I want my students to focus.

I have a lot to say about writing characters and well, writing short stories in general. So this is going to have to be a summary.
Lesson 5 consists of planning a story – we spend a lot of time talking about structuring stories, more on this later.
As soon as I have other posts finished, I’ll link them here. So far the plan is:

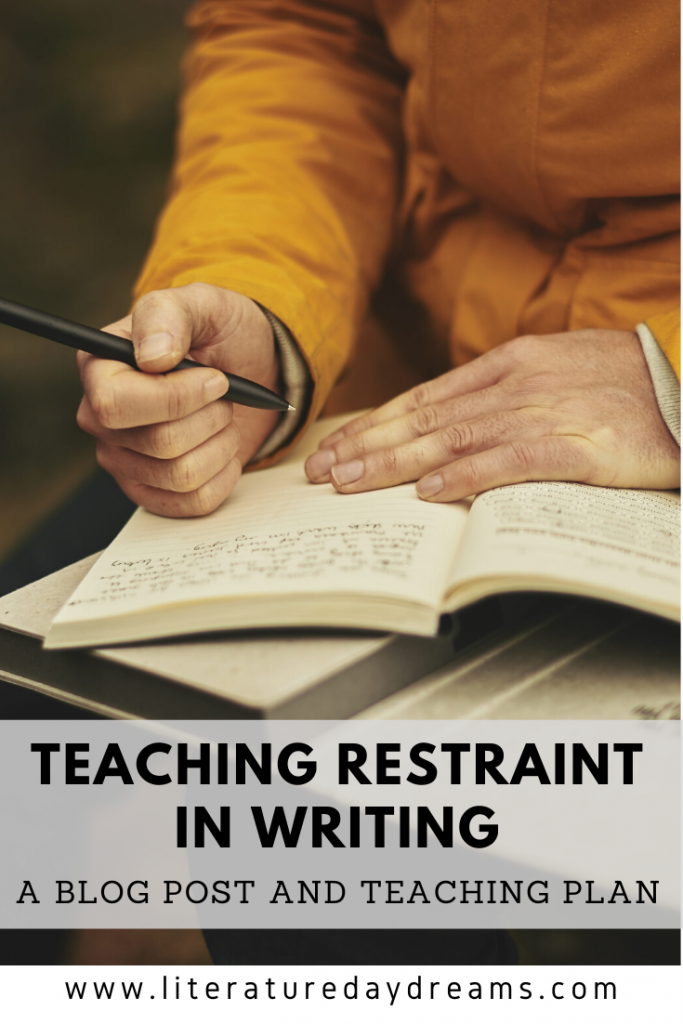
This blog post is a few years old now (I think I first published it in 2011), so many things in my teaching have changed since them, however, this necessity for restraint in description is something that has never left my practice. So, enjoy…
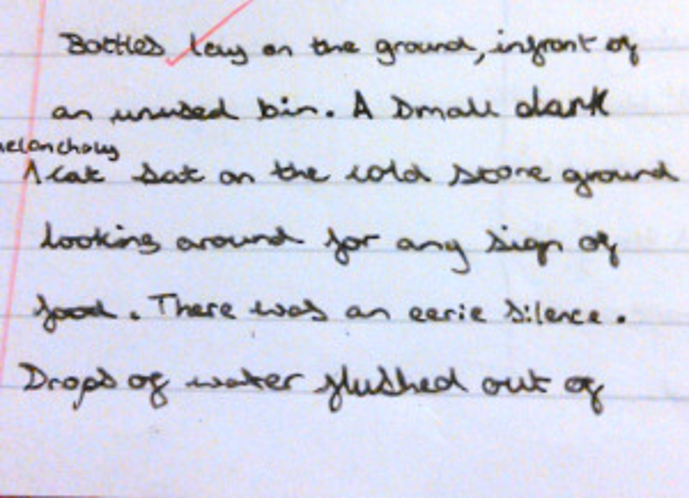
This was written by one of my year 7 students. It reads:
Bottles lay on the ground, in front of an unused bin. A small dark melancholy cat sat on the cold stone ground looking around for any sign of food. There was an eerie silence. Drops of water flushed out…
It continues in a similar vein for several paragraphs.
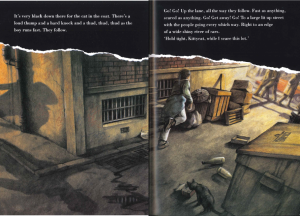
This is the picture the student was describing:
Many students believe that good writing is technique heavy. Perhaps because they don’t read widely, perhaps they don’t read regularly. So they are convinced that adjectives and adverbs are what’s needed. i want students to be able to write with subtlety and sub-text. They can learn when to withhold and when to run free.
If we layer technique upon technique, our writing can become cumbersome and over-embellished.
When I ask my pupils what good descriptive writing looks like – this is what they seem to think I want.
The curse of “show and don’t tell” has meant that pupils as writers are spoon-feeding their readers on a whole new level. Don’t show and don’t tell is perhaps a better maxim. (A side note on this – when we teach students techniques like ‘show and don’t tell’ remember they internalise language and I end up marking GCSE exam papers that read “The writer’s use of show and don’t tell suggests…) As I said, don’t show and don’t tell is sometimes better.
The literature that we study at school is only worthy of study because we have to study it. The reader’s interaction with the language of text – gleaning meaning where it is hidden, is what we do when we analyse. It’s not easy to write an essay paragraph using the quote “He slammed the fork down angrily” as there is nothing to infer. The writer has set it out for us.
When we teach pupils that they must create such a vivid image for the reader and that they must include as much detail as possible. Then we leave our readers with no work to do. Often their writing is filled with subjective emotional language, but by placing this into the text, they have robbed the reader of their own reaction.
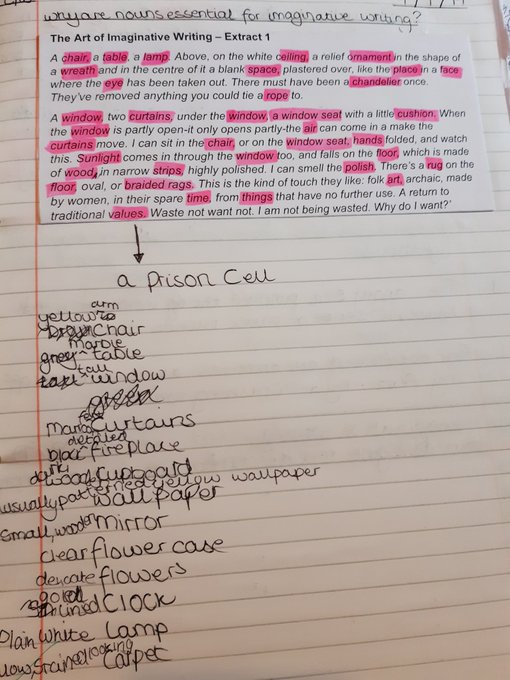
I am teaching a scheme of work studying Mystery and next week we are due to start reading Poe’s Murders in the Rue Morgue. In order to get into the mystery swing of things – this week I wanted pupils to pare back their writing, by writing description as detectives.
The lesson began with this extract from The Road by Cormac McCarthy (*klaxon* you might not want to use this text with every class!)
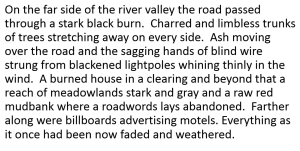
As detectives, pupils identified all the nouns and then explained what exactly was being described. I then asked them to remove all the grammatical words to force their focus on to the nouns and noun phrases. Finally we identified the adjectives.
By focusing on the nouns – students were more able to understand the ‘mystery’ in this extract. It almost sounds counter-intuitive but this literal description allows for detailed inference – “the sagging hands”.
Students had to explain this forensic, scientific approach to writing, that did not use any emotional, subjective language. They described McCarthy’s landscape as realistic or ‘true’ as the students named it.
This image then required a detective’s eye to describe. We started with nouns – precise and detailed.
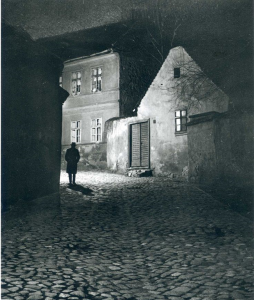
A few we listed were:
– a man, wearing an overcoat and hat
– a shuttered door
– four windows with six panes
– a building with high eves
Next I asked pupils to describe these nouns in the most scientific way possible and I asked why the sentence below is not forensic.
The shadowy, mysterious path went up to the crumbly, ancient building.
It was this part of the lesson that resulted in the most discussion and debate among students.
“You can’t use ‘eerie’ since when would a detective say it was ‘eerie’?”
“Gloomy is out – right Miss?”
“How can I say the building is old without exaggerating, it’s not ancient.”
By giving students the vocabulary ‘subjective’ and ’emotional’ they were able to critique their own ideas. Often writing down and then removing words that were considered to be weak.
The final 15 minutes of the lesson was spent writing just 10 sentences of scientific description. Here are some of their attempts:
On the face of it, this ability to show restraint in writing allows students to write in a manner that is more ‘true’.
Subjectively, I think this writing is closer to ‘good writing’ than writing that is created via a checklist of word types, sentence types, and techniques. It would certainly uphold more analytical scrutiny.
")
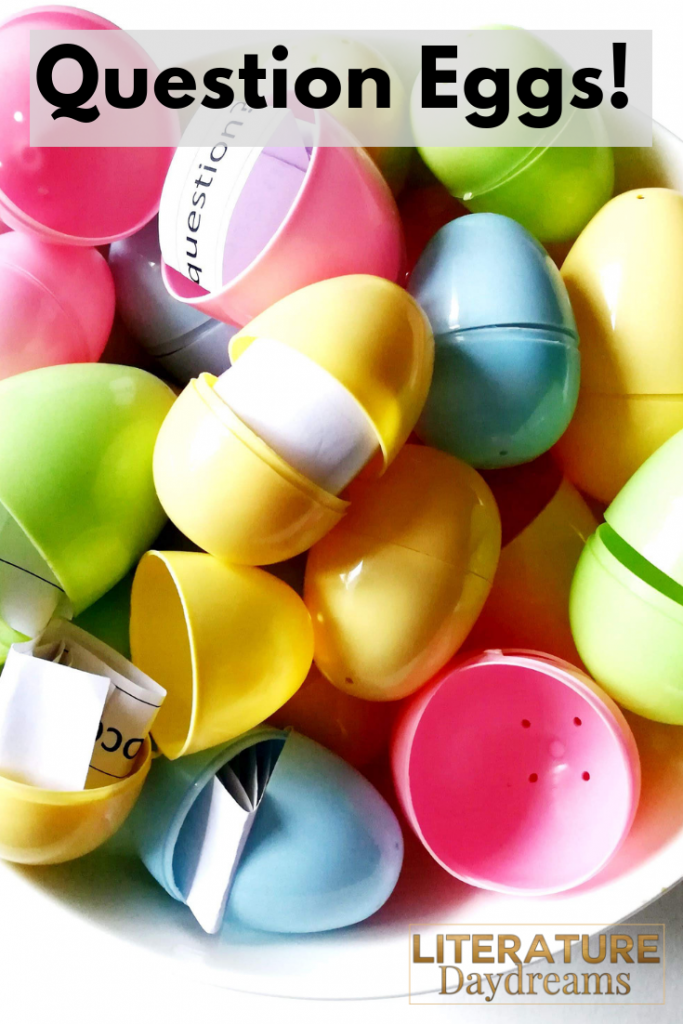
I love this questioning and review activity, is it perfect for the Spring and Easter season to bring a little fun to my classroom.
It’s about this time of year that supermarkets and pound (dollar) stores fill up with Easter goods. These little plastic eggs are a fabulous and cheap addition to your teacher-toolkit! They are great because the eggs come in 2 halves so you can put stuff inside. In my local store, you can buy a set of 12 plastic eggs like this for £1.

So as you can imagine, I have a whole load of them.
Place a different quiz question in each egg. Pass them around and get students to answer different questions from different eggs. All you need to do is to make a list of quiz questions on one page. Print and cut them into strips. You can create enough so that everyone has a different question or you can double up and have two sets circulating at once. This is a great way to review material in a low stakes test.
Fill some eggs with rewards and some eggs with challenges to generate a little bit of engagement in your activities.
Break up your new learning/information and place it into several eggs. Then get students to do an egg hunt to gather all the new information. So I would create 10 slips of paper with our new learning on. You can’t fit big pieces of paper in these eggs so you have to be concise. One strategy would be to number the slips and have students make sure they’ve gathered all of them. Or you could challenge your class by telling them there are 10 pieces of new information, they have to find them all and then get them into the correct order.
If you are teaching a text, then you could place quotations or textual references in different eggs for students to analyse.
For a writing task, you could place new vocabulary, writing techniques, different sentence structures into the eggs and students to self-select to create a success criteria or rubric for their own writing. I might choose to be a little more structured and include specific elements I want to see in writing. For example, one might say ‘simile’, another ‘metaphor’, another ‘personification’. I might also include instructions like ‘an 8-word sentence showing emotion’. Another might state ‘a character with a sinister motivation’. I have these in a huge bowl at the front and I ask the class to take 3 – 4, then they write these down as their success criteria. They can then return them and choose more.
Introduce new vocabulary by placing sentences on slips into the eggs. The new vocabulary word could be in capital letters. Students have to work out the meaning of the new vocabulary from the context of the sentence.
As you can see there are loads of different ways that you can use these plastic eggs in your classroom, just to add a little bit of fun and variety to your learning.
So if you see them in the shops this Spring, I would highly recommend picking while they are there! If you would prefer buying them online, then you can find them here:
US Amazon* UK Amazon*
*These are affiliate links. This doesn’t mean you pay any more or any less for the items shown. The price stays exactly the same. It does mean that I get paid a small commission if you buy these items using my link. It’s just enough to keep me going in cups of tea.

[print-me]
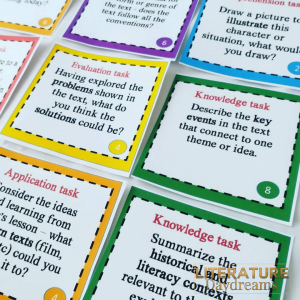
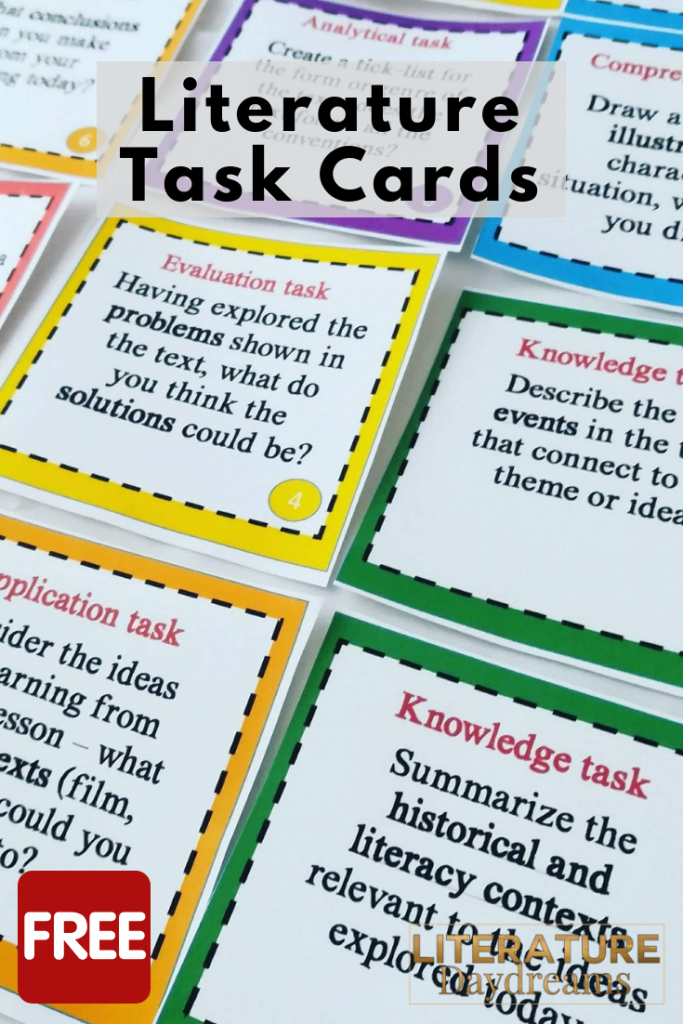
Reading literature is a huge part of English and ELA lesson time. Whether you are reading articles, short stories, or studying Shakespeare – it can be difficult often to find tasks that have the ability to engage and challenge students. I was finding that I was setting the same boring worksheets again and again. Fill out a table. Answer these quiz questions. While these are all fine. I wanted something more for my students. That is why I decided to create a set of task cards just for my literature texts.
Very simply these are a set of printable task cards with activities on that students can complete independently or in groups. All I had to do was print them once, in colour, and laminate them. Now I can take them out 4 – 5 times a week and use them with different classes.

The cards I created (and there is a free download here) are based on Blooms’ Taxonomy. There was no particular reason behind this, other than that I wanted to cover a range of skills. Some people treat Blooms’ like it is a hierarchy.
I didn’t want the task cards to be like that. Each of the tasks, I created 60 in total, are designed to get my students thinking. None is better than another.
Interested in downloading 10 tasks cards to try for free? Just click here!
If you love this activity – then sign up for my weekly “Making Sense on Sunday” email where I share two teaching ideas each week that you can use in your classroom straight away!

Sign up below to receive regular emails from me jammed packed with ELA teaching tips, tricks and free resources. Also access my free resource library!

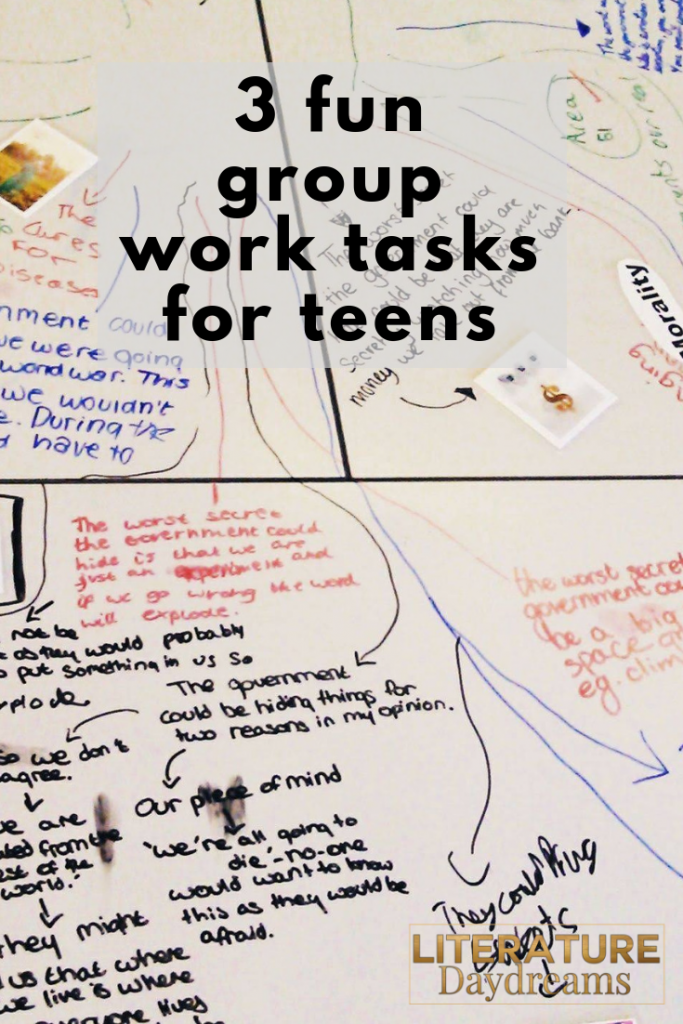
Do you want your teenage students to be more active and engaged in group work? Well, this blog post has some group work gems. These activities are guaranteed to get your students moving, keep them engaged, and get them more involved in their learning!
This activity is exactly what the title suggests. You turn student teams into human photocopiers! They work in groups to create an exact copy of a document you give them. This is great for teaching new material, reviewing prior learning, or consolidating your current unit.

Before you begin, you will need to decide what you want your students to recreate. I usually create A3 sheets with information that I want my class to understand.
Each sheet needs to contain a mixture of images, labels, short phrases, and text written in long form. I don’t produce these to be beautiful (this is partly the point). They are often handwritten and my own drawings to make them a little more tricky to recreate!
Sometimes I give all the groups the same sheet to reproduce. Sometimes I give them different information sheets to reproduce and then teach the rest of the class (a bit of reciprocal teaching is always good)!
This activity is a great way to review information and ideas, as well as work on short/long memorisation of key knowledge.
This super-simple strategy helps you manage team or group work but with a twist! It creates a sense of competition and can help keep students on task.
It is really simple – just click to download this PowerPoint slide

Then set up your group or teamwork as you usually would. This time use the racehorses to track the progress of each team. The team that completes all the tasks first wins 20 pts (or whatever you choose).
I have made the file completely editable so you can adjust it to fit your classes. The clipart is royalty free.
If you follow me on IG (please do!) – then you have probably seen me talking about the power of letting students write on your desks!
Yep, I said write on your desks. Of course, what I should have added was – with a dry-erase pen. This group work idea takes writing on the tables to another level. All you need to have to run this group work activity is dry erase pens for your students!
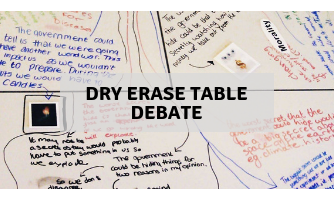
This is a really great strategy to use for classes who get distracted during group discussions, or where some students opt-out of participating (they can scribe). I just take a photo of the debate, quick print, and they stick in their notebooks!
Did you love these 3 group work ideas? I share teaching tips with my teacher-friends every Sunday via email. My “Making Sense on Sunday” email goes out each Sunday morning and it contains one classroom activity (like the ones above) and one activity to use with any reading or literature text. If you would like to hear my teaching tips first, then sign up below!
Sign up below to receive regular emails from me jammed packed with ELA teaching tips, tricks and free resources. Also access my free resource library!
")
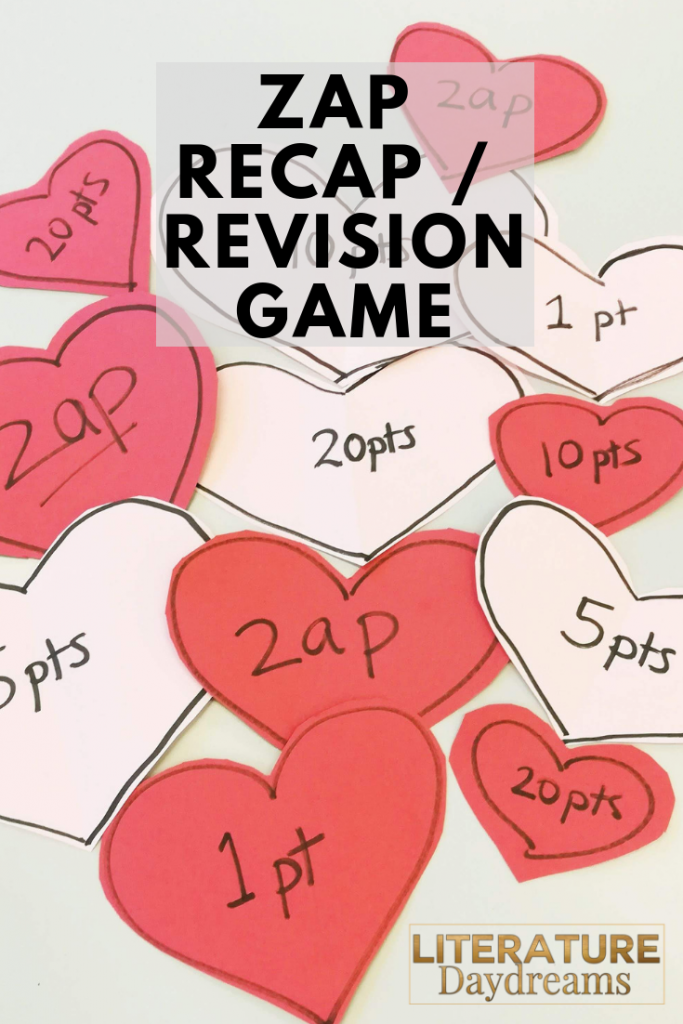
This recap/revision game is perfect for any GCSE subject and is a fun and engaging way to interest your students in their revision. It does require a little bit of preparation. But it is definitely worth it! Once you have it ready to go, it’s done for future use.
Here, I have shared my Valentine’s edition of the game. But it would be super easy to make seasonal – you could do coins for St Patrick’s Day, eggs for Easter, flowers for the summer, apples and pumpkins in the autumn, or gravestones at Halloween. Whatever shapes you like for the season! Of course, you can also use generic shapes: stars, clouds, fish – you choose!
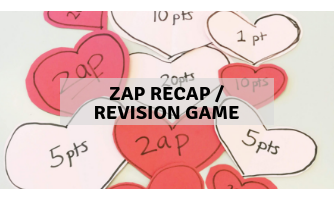
Here is the basic idea: the aim of the game is for your team to score as many points as possible.
Beforehand:
Playing the game:
This is a great fun activity for a tired Friday afternoon class and for reviewing key knowledge and information. Once you have made the shapes once, get them laminated and you can use them again and again.

Have you heard of the word grid challenge? This activity can be used in any subject area. It would make a great lesson starter, review task, or even as a homework activity. The best thing about this activity: it is super easy to create. In fact, I now have a bunch of word grids made up and ready to go in my classroom.
Simple, a word grid is, well exactly as it sounds, a grid with words in. I create a grid or table of 3 x 3 or 4 x 4 boxes. Inside each box, I place a different word. The challenge for my students is to connect each word on the grid to the topic we are currently studying. I make sure there is plenty of space around the grid for them to write notes.
Real talk time: I have a bunch of these made up and ready to use in my classroom. I make them so there are 2 per page. I tend to have a few leftovers. So sometimes I will just grab a set – with no prior thought (!) and ask my students to link the words to whatever text we are studying.
And you know what?! They always do it. They prove to me that they are capable of creative, out of the box thinking.
This week, the words I used with 3 different classes were:
I plucked these out of the air with no particular purpose in mind. My students were able to link them to a Shakespeare play, modern poetry, and a short non-fiction text on survival. This same set of words.
Generally, I do write these grids with specific words in mind. Perhaps I have taught my class the word ‘Machiavellian’ and I want to give them an opportunity to circle back round to the keyword from a new angle. Another strategy is to take key terms from a prior topic and see if they can apply them to this new topic. So for example, when reading A Christmas Carol, I might have looked at the idea of ’empathy’. I would add empathy to the word grid for a new topic on a different novel or text.
It’s super simple! Create the word grid: I simply make 2 tables in a Word document – ensuring there is enough room for pupils to write their ideas around the outside. Then:
Another strategy is to use your ‘leftover’ grids and give different grids to different students. That way you have more words being covered and more discussion about your topic.

If you love these teaching ideas, then you can sign up to my teaching tips email! Each Sunday you will receive “Making Sense on Sunday” and email stuff full of teaching ideas! Just sign up below!
Sign up below to receive regular emails from me jammed packed with ELA teaching tips, tricks and free resources. Also access my free resource library!

If you teach English or ELA, then you have probably heard of blackout poetry and blackout art. You might have even used this activity with your classes. Here is my take on blackout art -with a twist! You can use it with any literature text you are studying.
I wanted to find something new to do with those book-page scraps knocking about my classroom. So I decided to adjust the blackout poetry concept to fit studying literature. This activity is designed to be used after having read a little way into the novel or play because students will need to have a few things to say about the events, characters, or ideas.

If you are looking for other fun and engaging activities to use in your ELA classroom, why not check out these blog posts:
Also, each week I send an email out to my teacher-friends, in this message, I include one classroom activity (like the perfect review game) and one literature activity (like this blackout writing activity). They are always fun, engaging, and designed to create brilliant learning moments for your students. If you would like to receive this weekly email (I send it on a Sunday morning – ready to help stave off those Sunday scaries), then all you need to do is fill out the email sign up below!
Sign up below to receive regular emails from me jammed packed with ELA teaching tips, tricks and free resources. Also access my free resource library!

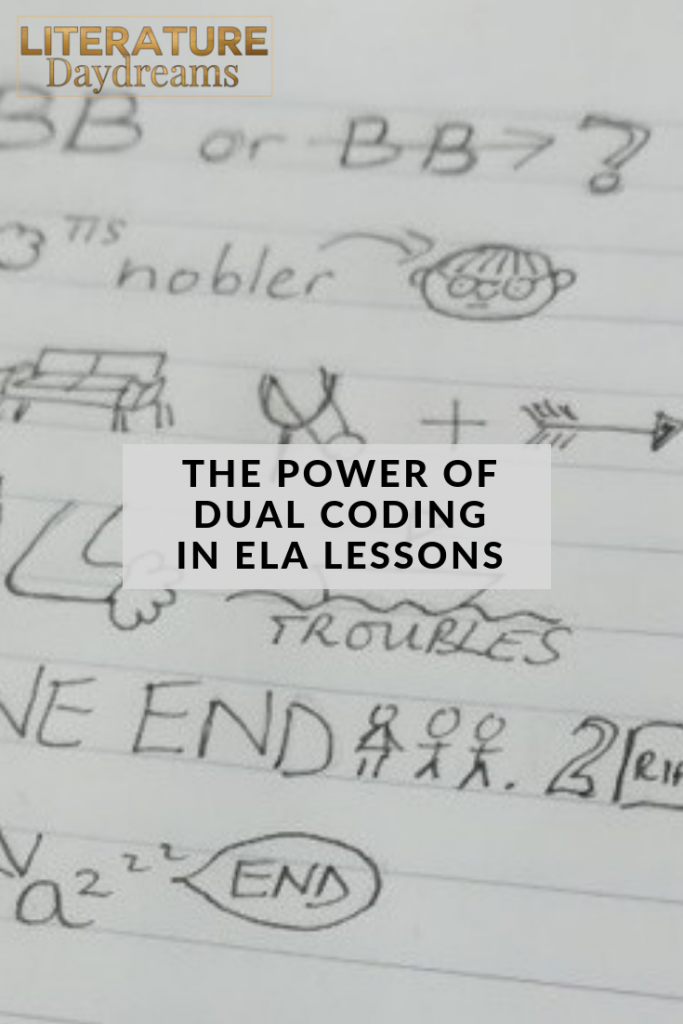
This activity is great to use with any class and almost any topic area. It makes sense, doesn’t it? To mix words and visuals to aid memory. Our students now need to memorize and to retrieve information for testing than ever before. Dual coding is one way to help students remember.
Dual coding is combining 2 ways that the mind remembers things – most commonly in the classroom – this is words and visuals.
Here you can see the beginning of Hamlet’s famous soliloquy “to be or not to be”. The challenge for students was to come up with as many visuals to replace the words in the speech as possible. They could be as creative as they liked – as long as they could read the whole speech based on what they produced. You can see the word “whether” is replaced by the sun and cloud and the word “suffer” is replaced by a sofa! The aural closeness of these words is the memory trigger.

This activity isn’t a quick crafty task or something for a Friday afternoon. It took my students a good hour to think through each word in the speech and then work out how to visualize it. This close attention to the text is just another memorization technique. The very work of recreating it, helps us remember it.
I first did this activity with a group of students 5 years ago. They are now in their final year of education and English hasn’t been compulsory for the last 2 years. But when I see these kids around the school – they still love to show off for me how much of this soliloquy they can remember. So they have been through 4 full school years since they learnt this speech and they can still remember it. Dual coding works!
I teach symbols and literary devices when I am covering creative writing – we use them as marking codes as well. Then we also use the same codes for our literature units. Then we layer them up as we read through the text. Does that make sense?
If you are looking for other fun and engaging activities to use in your ELA classroom, why not check out these blog posts:
Also, each week I send an email out to my teacher-friends, in this message, I include one classroom activity (like the perfect review game) and one literature activity (like this blackout writing activity). They are always fun, engaging, and designed to create brilliant learning moments for your students. If you would like to receive this weekly email (I send it on a Sunday morning – ready to help stave off those Sunday scaries), then all you need to do is fill out the email sign up below!
Sign up below to receive regular emails from me jammed packed with ELA teaching tips, tricks and free resources. Also access my free resource library!